
Introduction
A simple web search on the words virtual host might display the following suggested words, virtual host apache, virtual host Linux, virtual host Ubuntu, and virtual host configuration. While these suggested words may be an attempt to answer your questions on this topic. In this article, we will answer those questions and even go as further as showing you why and how to configure virtual hosts on Ubuntu 20.04 and 18.04.
In our Contabo review 2022 article, we talk about how you can gain much more from hosting your website with Contabo as compared to other VPS hosting providers. We will show how to further benefit from the flexibility of such hosting in terms of cost savings and configuration. If you are considering setting up or buying a virtual private server feel free to learn more about Contabo by Clicking here before you make any purchases.
What are virtual hosts or what is a virtual host?
Virtual hosting is a way of storing multiple websites on a single server. These websites are able to handle requests directed at them differently, while at the same time being able to share the resources on the machine. More often the resources shared include IP addresses, memory, bandwidth, and processing power. For example on this website https://digitalfreshman.com we could be hosting a subdomain such as forum.digitalfreshman.com on the same Virtual Private Server. Other than a subdomain it can also be a completely different domain name such as newsexample.com.
Why use virtual host?
One of the main reasons and advantages of using virtual hosting is to save money and resource utilization. Most small websites or businesses do not utilize or fully use all resources that are assigned to them on their virtual private servers, hence instead of buying another hosting package to use for email hosting or a different website or service. It is more cost-efficient to use the same package you currently have to host multiple websites.
Prerequesites in setting up virtual hosts
Before we start configuring or going into detail on how to set up a virtual host. If you are going to follow along you need a virtual private server running a LAMP stack. What this means is your server must have Linux, Apache, MySQL, and PHP. We will cover the configuration of the virtual host on Ubuntu 20.04 and 18.04. You can get a VPS by CLICKING HERE.
You will need root access to your virtual private server hosted by Contabo. As promised in the introduction. The following sections will contain practical steps on how to configure virtual hosts in Apache and Ubuntu. More importantly, you will also need a domain name. You can easily buy a domain name from Namecheap by clicking this link: https://digitalfreshman.com/Namecheap and in no time you will be ready to go.
How to configure Virtual Host on Ubuntu 20.04
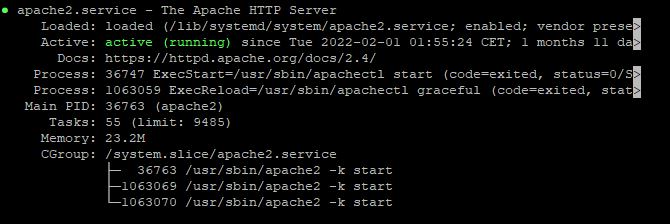
As mentioned earlier the virtual host will run on apache. We need to check that Apache is up and running, to do that we use the following command.
sudo systemctl status apache2
Output:
We also need to see the list of sites on our server and for this, we use the following command:
ls /etc/apache2/sites-available
Your Output may look similar to this:
000-default.conf       000-default-le-ssl.conf  default-ssl.conf
000-default.conf.dpkg-dist
Setting up a virtual host
For the purposes of demonstration, let’s create a virtual host for demosite.com.(You will need to replace demosite.com with your actual domain name from Namecheap). We are going to create a subdirectory with the following path /var/www/demosite.com/html. We are going to use this subdirectory to store the website files.
Step 1: Create a conf file
We are going to create the demosite.com.conf file for the virtual host. This file contains important directives on how requests to the demosite.com website must be handled by the server. In the sites-available directory, /etc/apache2/sites-available we need to create a demosite.com.conf file. To achieve this let us do the following:
- Switch directory using this command:
cd /etc/apache2/sites-available
- Copy the defaut conf file and create a new one:
sudo cp 000-default.com.conf demosite.com.conf
An alternative way of achieving the same result as above is to create a new demosite.com.conf without having to copy the original. To create a new file without copying the original you can use the following command from the root directory
sudo nano /etc/apache2/sites-available/demosite.com.conf
We strongly recommend using the first method, from experience default conf files are different from server to server. It is better to copy and edit.
Step 2 : Modify the virtual host demosite.com.conf file
In order to modify the demosite.com.conf file, you first need to navigate to its location and open the file. For simplicity, we recommend using WinSCP if you have FTP access to your server. By default on Contabo VPS S, this is usually available. So you can simply open the folder sites-available and click open the file demosite.com.conf and start editing.
Your new demosite.com.conf file might be as follows:
<VirtualHost *:80>
        #ServerName www.example.com
        #ServerAdmin webmaster@localhost
        DocumentRoot /var/www/html

        <FilesMatch \.php$>
             SetHandler "proxy:unix:/var/run/php/php7.4-fpm.sock|fcgi://localhost"
        </FilesMatch>

        ErrorLog /error.log
        CustomLog /access.log combined
</VirtualHost>
To edit the file do the following:
- ServerName: change to www.demosite.com
- ServerAdmin: put email address of Administrator for example admin@demosite.com
- DocumentRoot: put the folder path to where the website will be located for us it’s var/www/demosite.com/html.
- If there is ServerAlias in your conifg file use your website name for example demosite.com.
Step 3 – Create Website root directory
The demosite.com root directory is required to store the files of the website. from the previous step we also added the Document root path in the directives file. In this step, we are going to create the directory var/www/demosite.com/htm. They are two ways of doing this.
Use WinSCP
Using WinSCP you can simply follow these simple steps:
- Navigate to the var/www/ direcory
- Click on the new folder to create a new directory
- Rename new directory to demosite.com
- Open the new folder or directory var/www/demosite.com/
- Once inside create an new directory and rename it html
Using linux Commands
- Navigate to root directory.
- Create the directory for your domain as follows:
sudo mkdir /var/www/your_domain
3. Create the HTML root as follows:
sudo mkdir /var/www/your_domain/html
4. Assign ownership of the directory with the $USER environment variable.
sudo chown -R $USER:$USER /var/www/demosite.com/html
5. Set permissions to the file with the following command:
sudo chmod -R 755 /var/www/demosite.com/html
Step 4 – Enable The Virtual Host
The a2ensite is responsible for enabling a specified site within the apache2 configuration. it creates a symlink within the sites-enabled file. To enable our demosite.com website let us use the following command.
~#sudo a2ensite demosite.com.conf
Step 5 – Restart Apache
sudo systemctl restart apache2
If your DNS is configured correctly you should be able to reach your website. For testing, it is important to put some website files in the document root. If you are using Namecheap, avoid waiting too long for domain changes. Set the time to live to 1min instead of auto.
Adding A Second Website
To add a second or third website to the same server you can simply repeat all the steps above and you will be able to get the same results. Make sure you know how to add the proper name records in your DNS settings with your registrar. Each virtual host must have a different domain name or use a subdomain.
Conclusion
In this article, we learned how to configure a virtual host on Ubuntu 20.04, 18.04, and Apache. We also highlighted the reasons why small businesses and individuals might prefer to use virtual hosts. The main reason discussed were to cut costs and resource utilization. Each virtual host must have its domain name or subdomain name. We also need a virtual private server with root access in order to successfully set up a virtual host. It is also important to create a document root folder for each domain or virtual host.